
Insta360 Studio 2020 Full Guide & Tutorial (Updated)

If you own any of the Insta360 cameras then one of the first things you’ll want to do is download the free Insta360 Studio desktop software. While Insta360 has developed a reputation for excellent mobile editing apps the desktop version of their editing software is also a must have.
The Studio not only allows you to process your videos at the highest quality but also acts as a full editor & reframing centre, allowing you to transform your 360 videos into awesome, cinematic action shots. I created a similar tutorial a few years ago, however the software has changed significantly since then so it’s time for an update.
Insta360 Studio is a free & easy way to edit your footage; while it’s not as advanced as paid programs like Premiere Pro & lacks some of the editing options found in the app, it’s a decent tool for Insta360 content creators. Anyone who owns a Insta360 One R or Insta360 One X2 should read this guide to see how to use the Studio software.
Insta360 Studio 2020 Tutorial

When you drag a clip from your Insta360 camera into the studio software this is what you’ll see. You can preview your video as well as crop it by dragging either end of the yellow timeline at the bottom of the image.
If you want to keep the video in the 360 format then you can go ahead and render it now without any further editing. For those who want to turn the video into a “normal” flat video while controlling where the camera is pointing (also known as reframing) you’ll need to select the “Freecapture” tab at the top of the image.
Editing Options
When you select the Freecapture tab you’ll see some more options appear just above the yellow timeline. These are your main controls for editing your video. Let’s take a closer look at what each one means.

These are your editing options for editing video in the Insta360 Studio. From left to right they are:
Mark as Keyframe: When you start to choose the position of your camera through the timeline this is the button you’ll use to select where you want the camera to look. Probably the tool you’ll use the most.
Delete Keyframe: Fairly self explanatory. Use this tool to delete a keyframe if you change your mind.
Deep Track: One of the most popular features of the Insta360 Mobile App is now available on the desktop studio. Use this tool to track a moving person or object and have the camera follow them for as long as they are in view. I’ll show you what this looks like later in this tutorial.
Timeshift: Use this tool to speed up your footage. Several speed options are available to experiment with.
Motion Blur: This option becomes available when Timeshift is selected.
How To Reframe

To reframe your video all you need to do is go through the timeline and drag the preview screen to a position where you want the camera to be pointing. When you’ve selected the desired point click the keyframe button and a new keyframe will be created.
Go through the whole clip selecting where you want to the camera to be pointing and it will automatically move to that location. You can play back the video to see how your keyframes look. Experimenting with the distance between each keyframe will allow you to create more interesting footage.
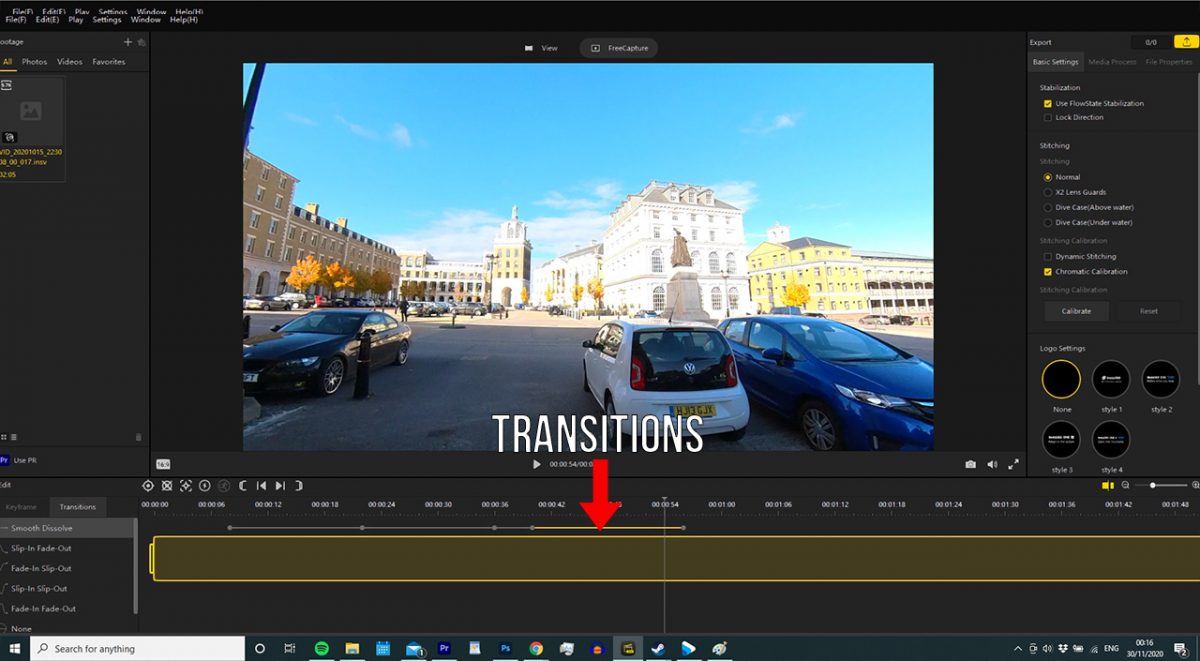
You can alter the transitions between each keyframe by selecting the lines that join them together, this will open up the transitions options in the lower left hand side.

Transitions indicated how at what pace the camera will move between each keyframe. Depending on the kind of effect you are looking for you may want to experiment with each one. Some transitions offer a more realistic effect where as some are more cinematic.
Speed Options

If you want to change the speed of your video, or just a section of it, select the timeshift tab and drag where you want the speed change to occur. This allows you to create “timeshifts” or moving time lapses as well as slow motions video. You can combine multiple speeds in a single video and have multiple speed options.
Deep Track

As I mentioned earlier, the Insta360 Studio 2020 comes with the Deep Tracking feature which allows you to automatically follow a person or object. Select the deep track option and the drag your mouse over the object you want to track. Select “Start Tracking” and the Studio will automatically track for as long as it can.
This is a great tool if you are recording fast moving objects like a skier or skateboarder, saving you the effort of having to manually track them.
Video Options

After you’ve finished editing your video you’ll want to take a look at the options on the right hand side of the software panel. The “Use Flowstate Stabilization” options will already be selected and you should leave it like that. Flowstate is the awesome stabilization software that keeps your video super smooth at all times.
Direction Lock is a great option if your want your video to follow the direction of your camera i.e. always be pointing forward. For example this would be a good option if you were recording a car journey with your camera attached to the dashboard, you will want it to always be pointing forward.
The Stitching options only apply if you are using accessories like a lens guard or dive case, if you aren’t then you can ignore them.
I’d recommend selecting both stitching calibration options as they will improve the overall look of your video and offer a more seamless stitch between the two lenses.
Export Options

When you select the export option you’ll see this tab appear. This is where you can alter some settings which may impact the quality of your overall video. I recommend selecting s bit rate of between 70 – 100mbps. Any more than this will simply increase the file size and not offer improved quality.
You also have the option of selecting either H.264 or H.265 encoding format. I recommend H.265 for its improved compression. The AI effects can improve the color vibrancy of your video and remove noise in darker areas, in most cases it’s best to select them.
And that’s it, now you have reframed & edited your video in the Insta360 Studio. While this tutorial shows you what all the options are and how/when to use them you’ll find the selecting the right keyframes to be the longest and most creative part of the process.
See Also: Insta360 One X2 vs Insta360 One R


Hi
How do I save a project? Sounds like a silly question but… well.. its just not there.
When I export, it crashed and the whole work just dies.
Hello,
i have a one x2 and i’d like use insta360 studio but it seems that it’s impossible to cut the vidéo !?
Do you know if there will be an update ?
Hi. when would you use ProRes 422? I see files are huge, and may have the wrong impression quality is better. I really can’t tell the difference. Disk space is no problem. Using iMac Retina 5K, i7, 64 GB, Radeon Pro 580 8 GB card. FCPX for editing. TIA.
The fact that you can’t split a video natively in the app makes this almost useless.
I recently started using the Insta360 Studio to edit my video taken with a ONE R. I copied the insta files from the memory card to my iMac hard drive. In one clip, I chose to Deep Track a runner who approached from behind and ran passed me so the view pans 180 degrees. Having exported the clip, I noticed that the video is quite jumpy as it pans, rather than smooth as it was on previewing within Studio. I then made the same edit using the app connected to the ONE R and exported. The resulting video was smooth, as hoped.
The export settings from the app was: Bitrate 25, FPS 30, H.264
The Studio default was: Bitrate 75, FPS 29.97, H.264
I tried exporting from Studio with Bitrate 25 and then with H.265 but every time the video was jumpy. Is the FPS being 29.97 rather than 30 significant? I can’t change that in the Studio settings, it’s greyed out.
I’d rather use the desktop application to edit to save my eyesight, but I may have to stick to the app on the phone.
I’m using the latest Insta360 Studio 2021 v4.0.1 from Oct 19 (build 770) on an iMac.
Thanks for any assistance!