

I’m going to show you how to shoot awesome video with your Insta360 One X. I’m going to take you through the correct settings to use on your camera, how to position the camera when you are shooting for different effects and how to use the editing app to achieve those effects. For users who are already familiar with the One X you can skip a few paragraph to see some more advanced stuff, but for anyone new or just starting it’s best to read the whole post. Let’s get going!
Set up One X
Before shooting you’ll need to make sure you’ve downloaded the Insta360 Studio desktop software and Insta360 One X App, connected the camera to the app and that you have the accessories that you’ll need.

The absolute minimum that I recommend is that you get the invisible selfie stick. This does exactly what you think it does and makes the selfie stick completely invisible in your videos shot with the One X.
Insta360 have a few to choose from on their website. Also one of the downsides of the One X is that is has a pretty poor battery, so you might want to get a spare just in case.

Shooting Moving Video
I’m going to start off with the more simple shots that you might do, moving shots that involve you walking with the camera attached to the selfie stick. I’m also going to assume you are outdoors in daylight so you can leave the settings on auto. Just make sure you’ve set the camera to 5.7K @30fps which will deliver the best quality in these conditions.
When shooting moving video extend the selfie stick so that the camera is at least a metre away from your body and make sure the camera is parallel to the selfie stick. you don’t want to use the camera like this as the selfie stick will be visible. Now you can simple walk around with the selfie stick pointing in a clear direction. You’ll want to avoid moving the stick in different directions too much as it can create shaky video.
This type of video is great for B-Roll as you can use it to pan around which ever environment you are in. Go to the app and download the video form your camera, now you can edit it in the One X App’s re-framing centre. Here you can select where you want the camera to be pointing at any one time. Simply swipe the image and tap the pivot point button, then go through the timeline and repeat the process. Alternatively you can use the phones gyroscope to move your phone and record that way. You can achieve some awesome effects with this which I’ll go into move later.
Third Person
To achieve a “3rd person” effect, kinda like you’re a character in GTA, all you need to do is extend your selfie stick to a reasonably long distance and hold it over your shoulder like this.
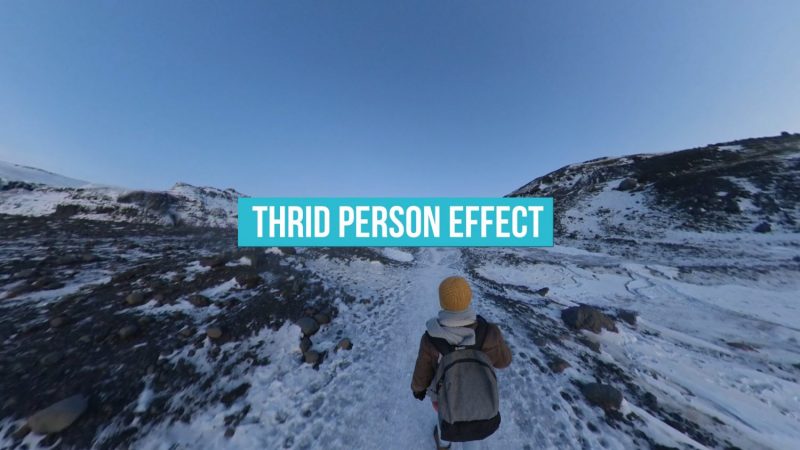
Now just walk around making sure not to twist or turn the camera too much. In the app select pivot points every 10 seconds or so making sure the camera is looking at you or looking forward. You can also use the tracking feature in the app which will track a specific moving object for a certain period of time.
First Person
This is a similar effect but instead of holding the stick behind you this same point it in front of you. Make sure the camera is at least a metre away from you and is roughly parallel to your face.
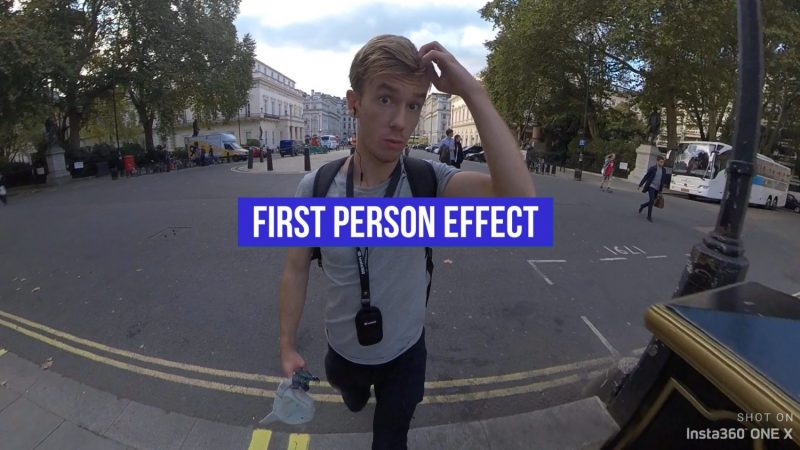
You might even be able to fit stick in a jacket pocket so it will really look like someone else is filming you. In the app place pivot points at the centre of your face every 5 seconds or so. You can also place a pivot point on the opposite side to move between third and first person view.
Ground Track
Another cool effect can be achieved by holding the selfie stick pointing downwards and to the side while you are walking. The resulting video looking like you are being tracked by a moving camera on the ground. All you need to do is go to the app and again make sure the pivot points are pointing directly at you.

Drone
If you want to achieve a drone effect this is also possible with the One X. First position the One X close to the ground with your selfie stick extended as much as possible.

Then simply move the selfie stick so it’s pointing straight up as high as you can get it. You can also move backwards to further mimic the drone effect. The longer stick you have the better this effect will look. In the app make sure the pivot points are focused on a the same subject at both the start and end of the video.
Still Shots
If you want to create a virtual tour or just want to record the landscape without moving then the One X has a great feature for you. Go to the video options and select HDR mode. This mode will allow the One X to shoot better quality video using multiple exposures. This only works when the camera isn’t moving and it’s a great way to show your viewers the environment you are shooting in.
Tiny Planet
This is another shot you can make while your camera is not moving on a tripod. Find an area with lots of space, like a beach or park. Place your camera around waist height and run around it in a circle. In the app zoom all the way out into tiny planet mode and watch how you run around your own little world.
Stick it where you shouldn’t
I really couldn’t think of any other way to put it, but with the One X you really can stick it where you shouldn’t. The invisible selfie stick and tiny width of the camera means you can you put it places other cameras wouldn’t fit or wouldn’t look great. Usually in between gaps in windows, railings.
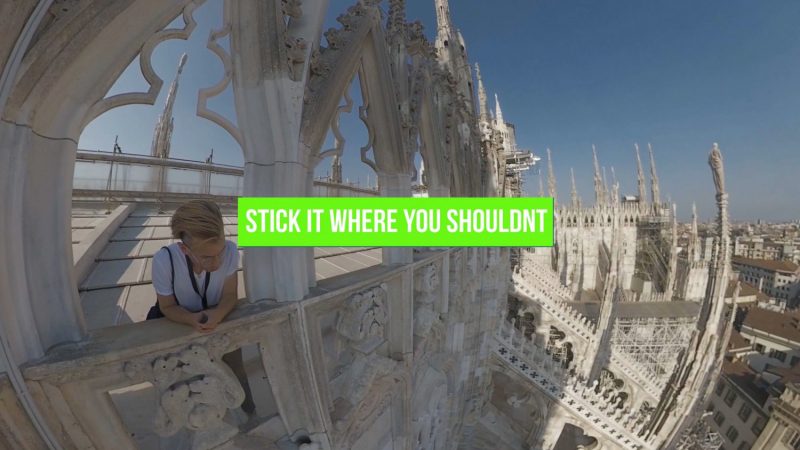
Extend the selfie stick and poke it though, making sure to keep a firm two handed grip. In the app you can make it seem as if the camera is floating outside the building or flying in between impossible places. make sure to look down if you are high up!
Tell a Story
Sometimes you really don’t need all of these fancy effects and camera movements. Sometimes you just need to record a cool moment and use the re-framing feature to tell the story.

You can imagine yourself as a cameraman, but you get to choose where you point the camera after you shoot. This gives you a lot more freedom to experiment and create some great looking vlogs.
While I’ve shown you how to achieve these effects using the mobile app you may not be conformable editing using a small touch screen. If you prefer desktop editing then download the Insta360 Studio which allows you to achieve most of the same effects on a desktop.
TimeShift and Hyperlapse
Timeshift And Hyperlapse are two of my favourite video modes in the One X, which is why I’m dedicating an entire video on how to make them! As of now these features are only possible using the mobile app and not the Insta360 Studio software. If you have premiere pro then you can also use that to achieve the effect.
Let’s start with Hyperlapse. This is an effect where the speed of the video is greatly increased while the focus remains constant. It used to be very difficult to make these kinds of videos however 360 cameras allow us to make them quickly and easily.
Set your insta360 to 5.7K @30 fps, the highest quality possible. Either using a selfie stick or mini tripod hole your insta360 with the LCD screen facing forward. You’ll maintain this position the whole time you are shooting. Now walk in a straight line while recording, don’t turn the camera lens or you may see a stitching line. To achieve the best effect you should record for at least 4 or 5 minutes for a 15-20 second hyperlapse.
Now go to the App and upload your video. Go to the speed section and select your desired speed. At least 16x speed is recommended and 32 will work best for videos more than 5 minutes in length. Select pivot points at the centre of the video if the camera moves to maintain the forward facing direction. After rendering you should have your hyper-lapse.
Spinning Hyperlapse
If you want to record a hyper-lapse that looks like this then follow these instructions. The principle is the same as a normal hyper-lapse but instead of keeping the LCD screen facing forward you keep it pointing at the object you want to film. As you walk around it very slowly turn the camera so the screen is always pointing at it. In the app add pivot points every few seconds at the centre of the object so it remains central to the video.
TimeShift
A Timeshift is similar to a hyper-lapse but features a mix of normal speed, slow motion and normal speed video too. A Timeshift can look great if you learn how to edit them correctly. The entire effect is created in the editing process on the Insta360 One X app, you can film a timeshift in exactly the same way you shoot a hyper-lapse, just make sure you film for at least a few minutes.
TimeShifts work best if you have a long video with several interesting moments. Go to the speed section in your video and select 16 or 32x speed up until you see an interesting point in your video you want to focus on. Stop the hyper-lapse speed there. Select your pivot points to be pointing forward for the hyper-lapse section apart from the very last moment where you should select a pivot point that focuses on the point of interest. For the remainder of the normal speed section keep the pivot points focused on this object. After 5 or so seconds of normal speed select a pivot point to return facing forward. Now go back to speed settings and bump the speed back up to hyper-lapse from this point.
Depending on the length of your video you can create many of these interest points, this is great for a city tour or walk around the countryside where there may not necessarily be something interesting to look at all the time but you still want to show your viewers the best bits.
You can utilise slow motion in this mode as well, however you’ll have to reduce the overall video quality to 4K, but for some situations the loss of quality is worth the extra frame rates.


