

People have discovered so many ways to create content with your 360 camera, and Tiny Planets are among the most creative. These unique shots, possible only with a 360 camera, tend stand out on social media and soon you’ll see why.
In this guide, I’ll show you how to create seven unique Tiny Planet shots and all you’ll need is a 360 camera (in the examples in this post I’m using the Insta360 X4), mini tripod and the Insta360 App or Desktop Studio.
Watch the Tiny Planet Video guide for the most comprehensive instructions for creating Tiny Planet videos:
Standard Tiny Planet
A standard tiny planet it super easy to create. You can create this effect wile moving with your camera attached to a selfie stick or when the camera is still on a tripod. It usually works best in a field, beach or on top of a building where there is nothing too close to the camera.
Select which shot you want to apply the effect to in the Insta360 Studio or App. In the reframing controls there is an option to instantly create the Tiny Planet effect which you can then manipulate as the video plays.
But let me show you some shooting tricks to get even better time planet videos that can go viral.

Walking on Your Planet
To get the walking tiny planet effect attach your camera to a small tripod and place it on the ground. Now take a few steps back from your camera and let it record while you walk or run around your camera. Run around the camera, allowing for a few metres distance, for 3 or 4 laps so there’s enough footage.
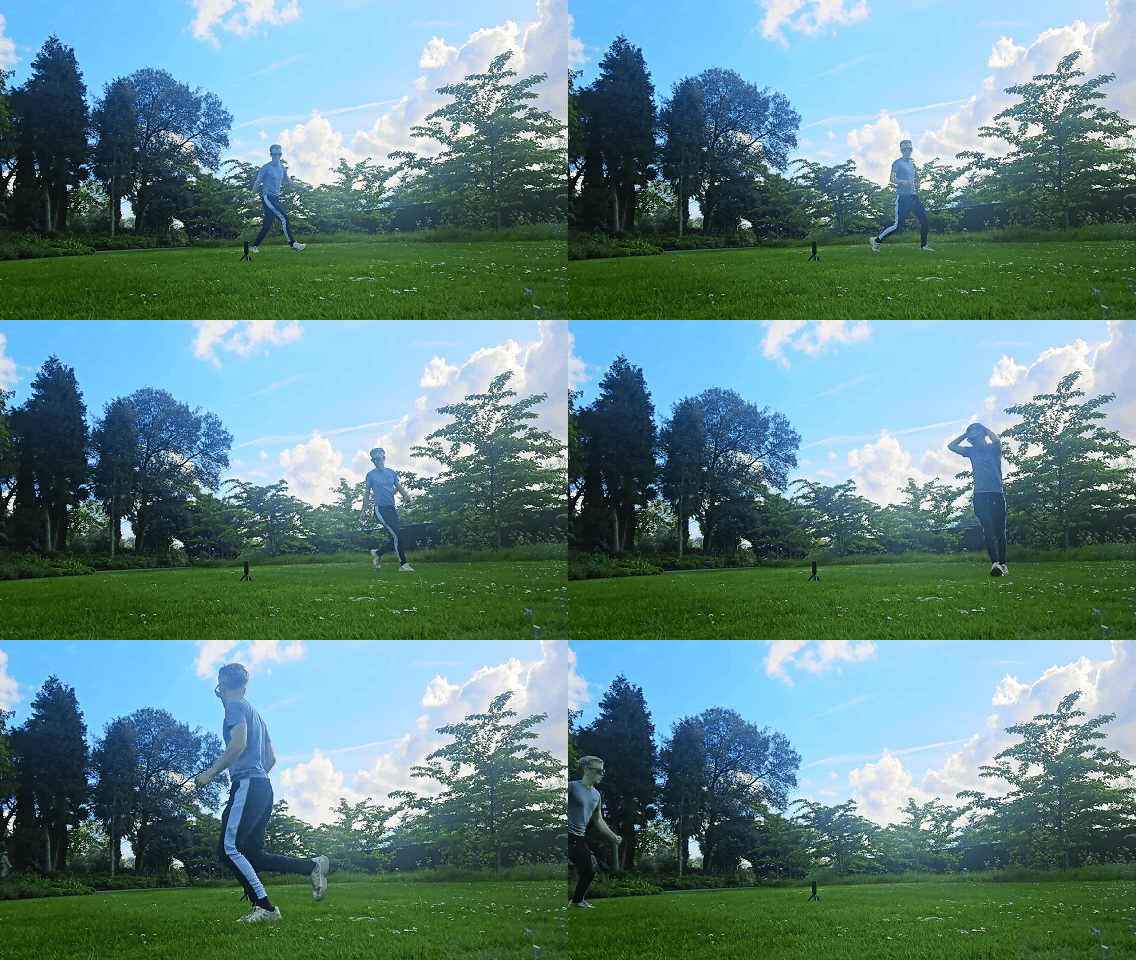
In the Insta360 Studio or App create the tiny planet effect as I showed before at the start of your video. As the video plays adjust the “Roll Angel” parameter so that you always remain at the top of the Tiny Planet and add keyframes every few seconds with this adjustment. Now when you play it back it will look like you are walking or running on top of the Tiny Planet
Top Tip: This type of shot works best in open areas with no tall objects near you like a beach or field.
Inverted Tiny Planet
An inverted Tiny Planet is essentially just the opposite of a “normal” Tiny planet. You shoot this in exactly the same way as a normal Tiny Planet but edit slightly differently. Select the clip you want to edit and once again select the Tiny Planet pre-set on your first keyframe.

Now go to the Tilt Angel option and drag it down until the tiny planet it completely inverted. You can also add the walking effect in the same way as before, by adjusting the Roll Angle Option and adding keyframes so that the camera position always have you at the bottom of the circle.
Inverted tiny planets look best when surrounded by very tall objects like trees or buildings.
Planet Jump
You can create a cool Jumping transition between the two types of tiny planets. With your camera on the ground take a few steps back, now take jump as high as you can and land like you are tying to push the ground down below you.
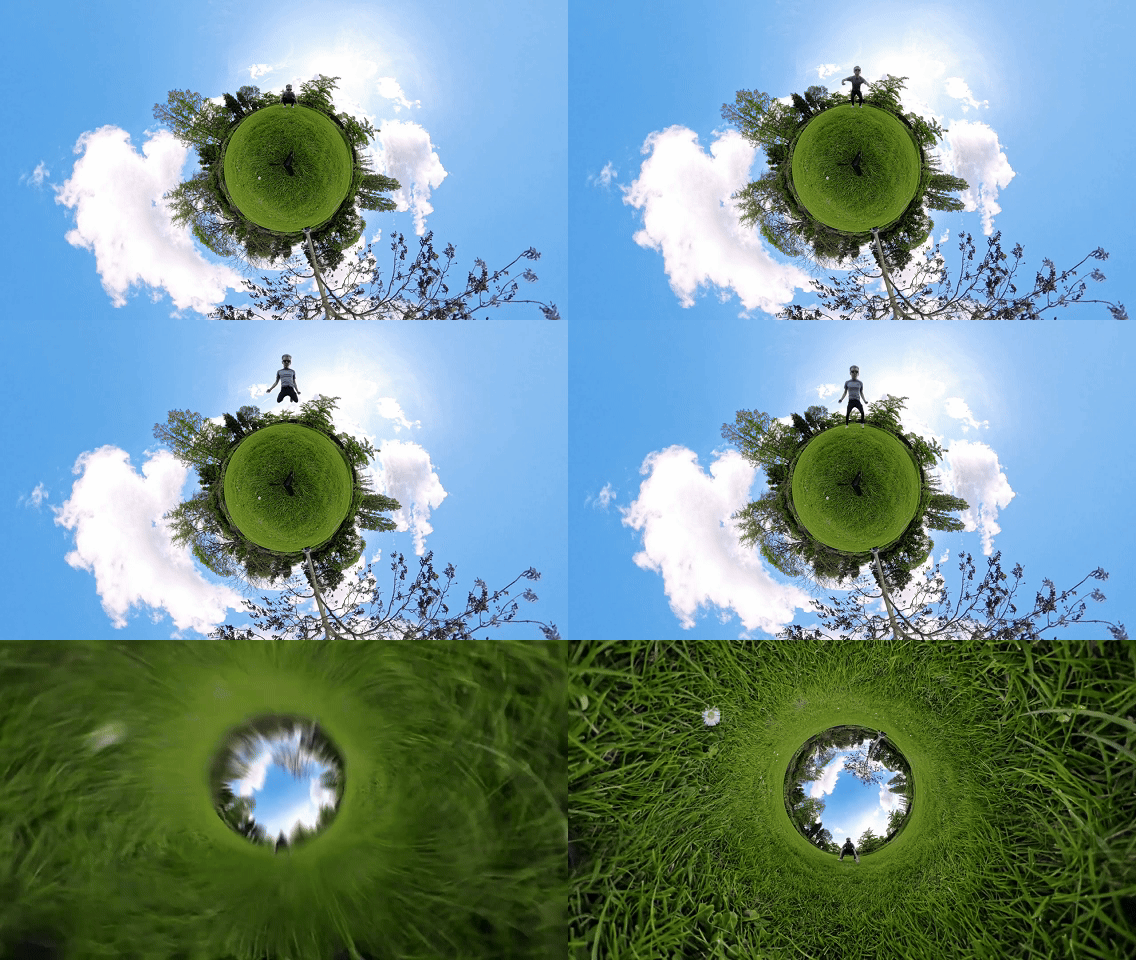
Select your clip in the Studio or App and make your first keyframe a standard tiny planet. Find the moment when you have jumped and your feet are just about to hit the ground and add another keyframe without any editing. Now add one more keyframe 1 second later and change the tilt angel so the video turns int an inverted tiny planet.
To make the transition more dynamic you can add a shake effect in an editor like CapCut
Flower Tunnel
This is a great video to shoot during spring or summer and always gets people attention. Attach your camera to an invisible selfie stick and find a flowerbed that’s long enough to walk along for at least 10-15 seconds.

Extend your camera to around 1 metre from your body and point it so it’s just above the flowerbed. Now walk along and record with you camera just above the flowers.
In the editor mark your first keyframe so that’s an inverted tiny planet. You can adjust the zoom so that more or less of the flowers are visible
Rabbit Hole
For this simple but effective video place your camera on a mini tripod and find some long grass or flowers. Place the camera amongst the foliage and start recording, try and make sure the camera is surrounded, but nothing in directly touching either lens.
In the editor create the inverted tiny planet effect. I recommend starting with the image slightly zoomed in and them slowing zooming out over 10 or 15 seconds. It looks great if you cam include yourself looking into the rabbit role.
Tiny Planet Take Off
Get a drone-like effect that will make your viewers wonder how you did it. You’ll need the extra long invisible selfie stick and a large open area like a field. Extend the selfie stick with the camera to at least 1.5m, now lay down and hold the selfie stick with your legs. You might find it easier if there’s a small tripod attached at the bottom. Now just let the camera record for 15-20 seconds while you lay on the grass or sand.
In the editor mark your first keyframe so that the camera is looking down directly at you zoomed in. Now add another keyframe 15 seconds later select the tiny planet pre-set. The video should slowly pan out and end up as a tiny planet with you at the centre.
Wormhole
Maybe the most trippy of the tiny planet shots but also very easy to create. Attach your camera to an invisible selfie stick, an extra long one would be useful here, and extend it to its full length.

Stand somewhere that doesn’t have any objects within a few metres of you, like a beach or field. Stand on the spot and swing your camera closer to the floor in a circular motion for 5- 10 seconds.
In the Insta360 editor create an “inverted tiny planet” effect and mark a keyframe so that you are at the bottom of the shot – now add keyframes every second or so ensuring you remain in that position as the camera is moving. You should not have a “wormhole” shot
All of these effects plus over 60 video lessons are available in my Insta360 Video Course – the largest video course covering how to use your Insta360 camera and create amazing shots.